DaVinci Resolve becomes challenging when working or editing high-resolution raw files, resulting in lags and choppy playback. Moreover, the frame rate drops, and ensuring a smooth creative workflow becomes difficult. The Resolve allows for the optimization of larger media files and smooth playback.Â
Whether you are a professional or a new user, understanding how to optimize files is essential for faster rendering. So, following a few steps is necessary to ensure smooth workflow and real-time playback.
What is Optimized Media in DaVinci Resolve?
As the name describes, DaVinci Resolves Optimized Media refers to the optimized media for smooth performance. So, why is there a need to “optimize the media?†Optimizing Media enhances the system’s functionality by replacing it with a more efficient codec for smoother playback and processing.
The Resolve uses .dvcc files during editing to create optimized media. The .dvcc files are a segmented series of thousands of smaller files that work only with Resolve and on the same system.Â
Sometimes, working with 4k or 8k files becomes difficult for the system. So, the Optimized Media feature lowers the resolution without impacting the quality for a smooth workflow. The high-resolution media files require extensive processing power, which affects the editing and real-time playback. So, optimization creates lower-resolution media for smooth editing.
Note: For Optimized Media, ensure the system has enough storage because it consumes significant space during optimization. Also, available storage is essential to prevent optimization issues.Â
How to Generate Optimized Media?
It becomes frustrating when playing back higher-resolution media files, especially on older computers. So, Optimized Media is essential to ensure your editing software keeps up with the smooth workflow. Hereunder is the step-by-step guideline to generate optimized media to provide seamless playback.Â
Step 1- Importing the Media Files
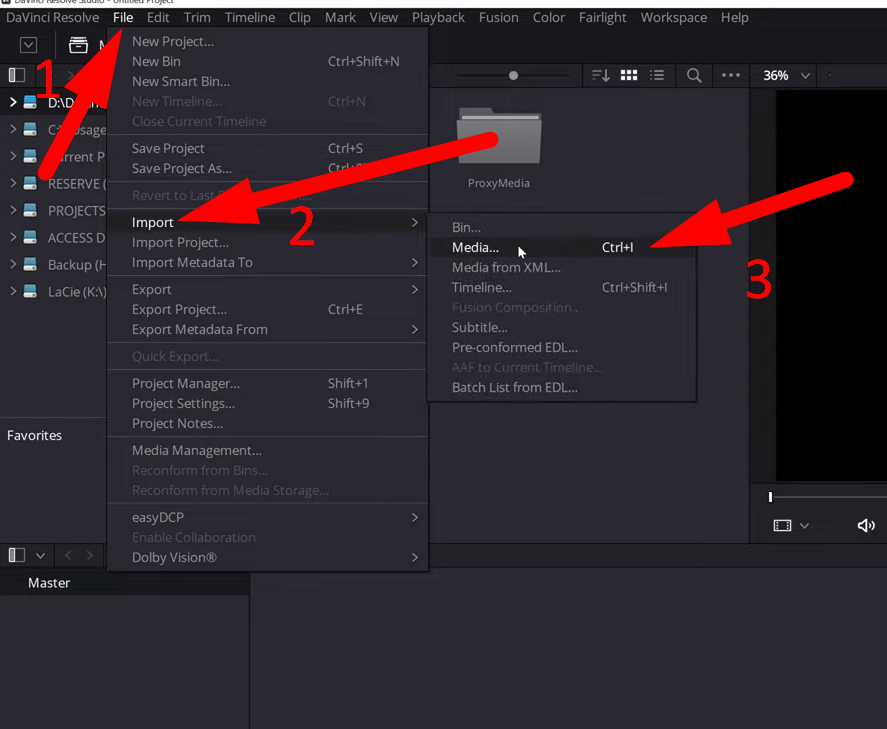
- Launch DaVinci Resolve on your computer and open or create a new project.
- Go to the “File†menu from the top-left and select “Import File,†then choose “Import Media.â€
- Navigate to your original raw file location, select the required files, right-click them, and then choose “Add to Media Pool.â€
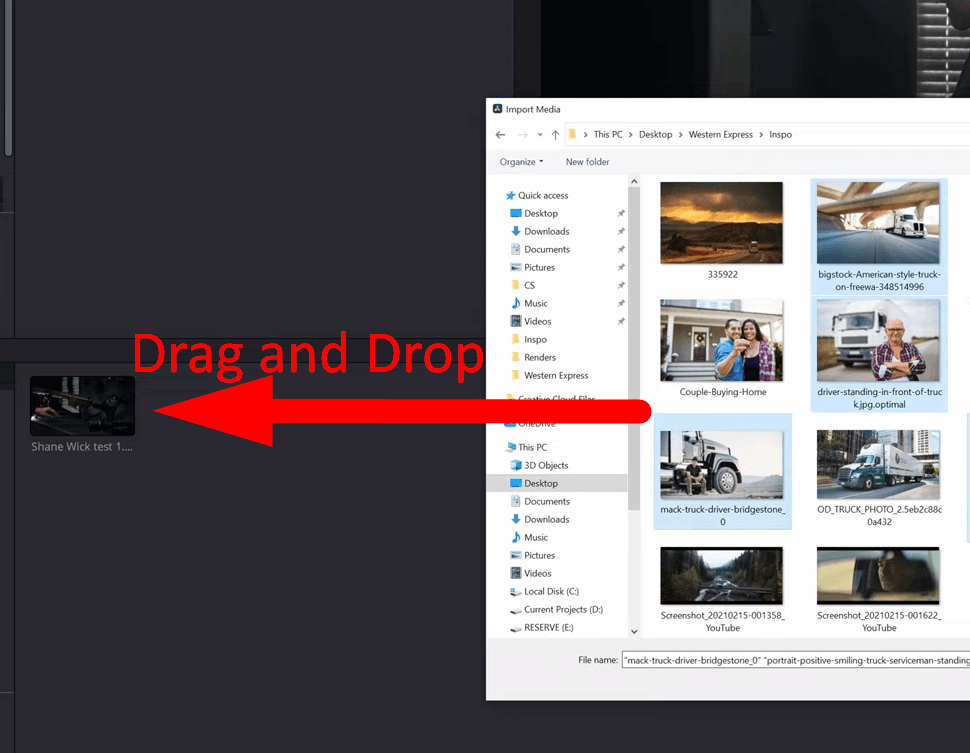
- Alternatively, select the files and drag and drop them into the media pool.
Step 2- Adjusting the Project Settings
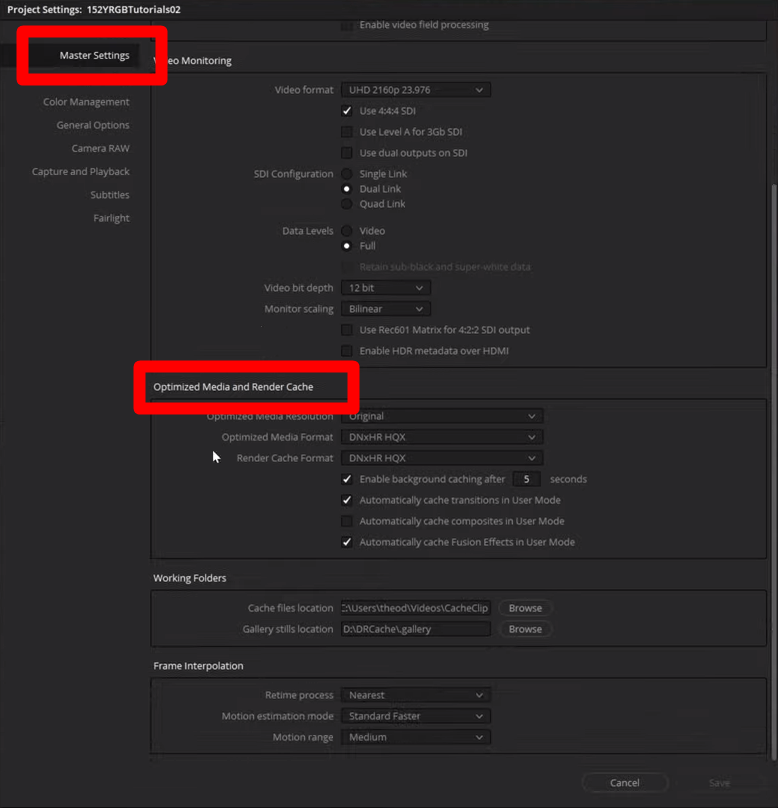
- Once files are imported, open the project settings by navigating to the “gear icon†from the bottom right corner.
- Alternatively, press the “Shift + 9†shortcut key to open the settings and choose “Master Settings.â€
- Then scroll down to “Optimized Media and Rendered Cache.â€
Before starting the optimization, setting the following settings for a smooth workflow is essential.
- Optimized Media Resolution
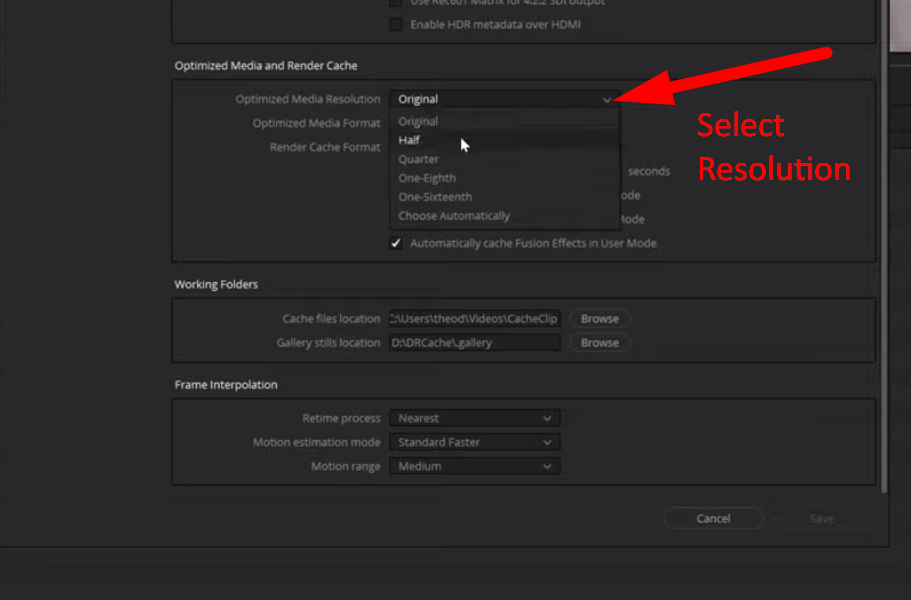
- The “Optimized Media Resolution†is default set to “Original.â€Â
- So click on it to change the media resolution from the drop-down list. It will also enable you to select “Choose Automatically†for the desired resolution.
It’s essential if you have set the timeline to 1080 and have footage in 4k. After optimizing the resolution, the proxies will be in 1080, making them easier to work with.
- Optimized Media Format
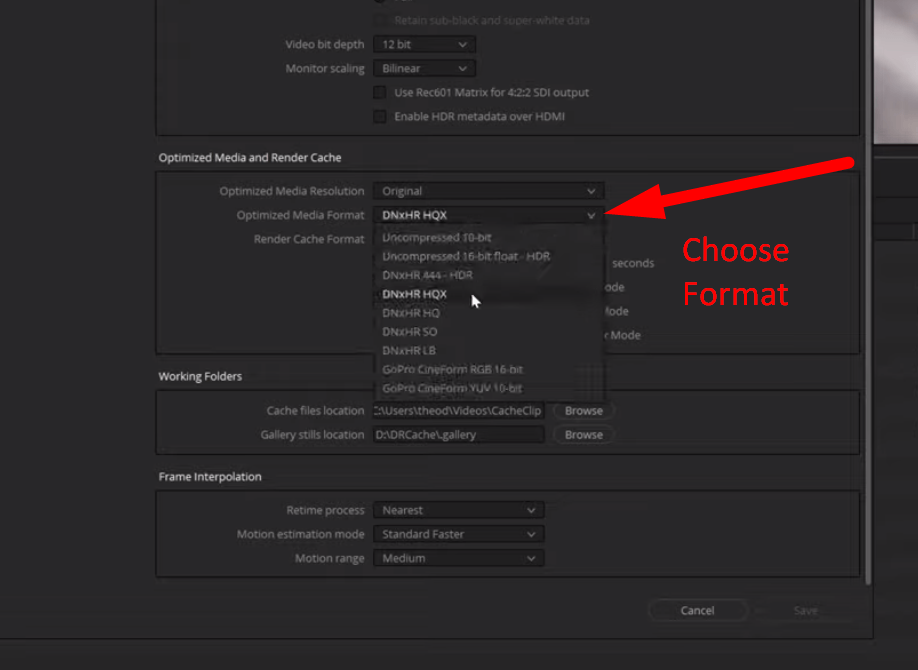
- Navigate to “Optimize Media Format†to choose the format to encode new files.
- It’s necessary to choose a smaller file format than the original file.
- If you are editing, then select a smaller file format, such as “ProRes 422LT or ProRes 422†for Mac or “DNxHR LB,†“DNxHR HD,†or “DNxHR SQ†for Windows. Â
- For grading, “DNxHR HDR†is the perfect option, and if you are using the “Alpha†channel, then use “ProRes 4444 or ProRes 4444XQ.â€
Note: Smaller file sizes such as “ProRes 422LT†provide faster playback than ProRes 422 or ProRes 422 HQ.Â
- Storing the Optimized Media
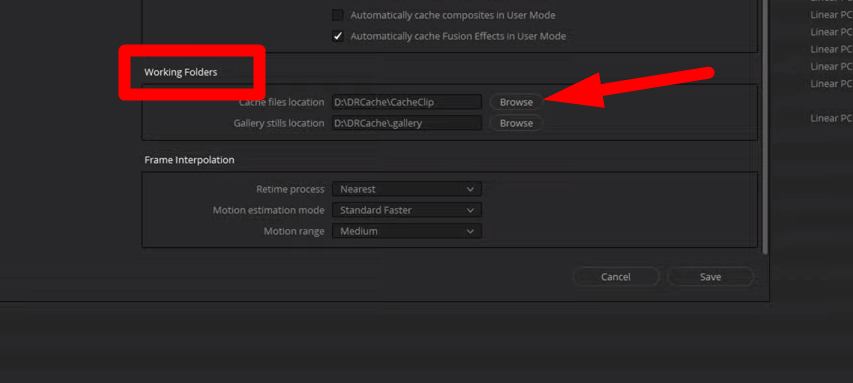
- Scroll down to the “Working Folders†section, and the optimized Media rendered is stored in the “Cache File Locations.â€
- The Optimized Media will automatically save to the default “Cache Files†location.
- Click “Browse†to change the storage location and use an external hard drive to store or save the files.
- If you are satisfied after adjusting these settings, click “Save†to save the preferred changes.
Note: Saving optimized files on your computer further slows the computer and negatively impacts the project’s folder structure. So, it’s necessary to use external storage for smooth playback of your media files.Â
- Optimized Media in Bin
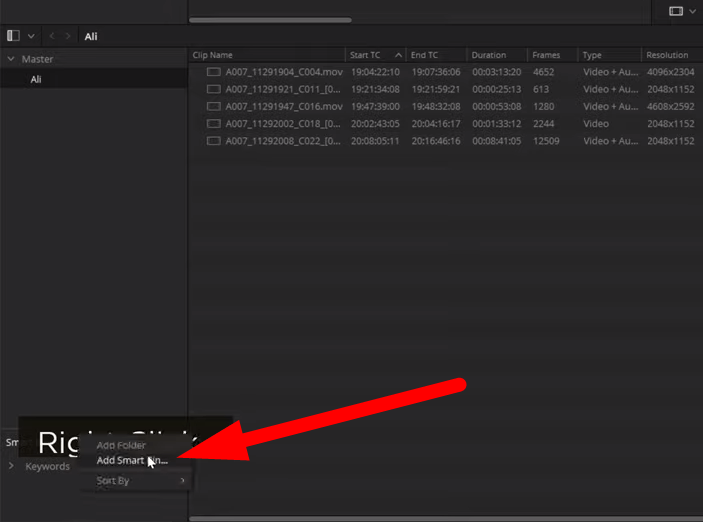
- Once in the project timeline, go to the “Smart Bins†from the bottom left, and it will show all the files.
- Right-click on “Smart Bins†and select “Add a Smart Bin.â€Â
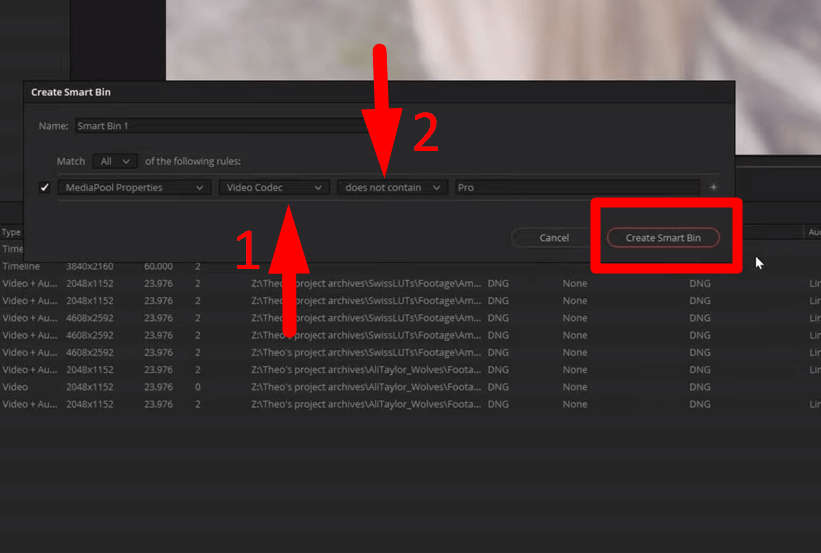
- Then click the “File Name†tab and choose “Video Codec†from the drop-down menu.
- Select “does not contain†under the “Contains†tab and click “Create Smart Bin.â€
Bin allows you to group clips and helps you keep track of the files with optimized version availability. So, it will enable you to select specific media files that require optimization and save storage or processing time.Â
Step 3- Generate Optimized Media
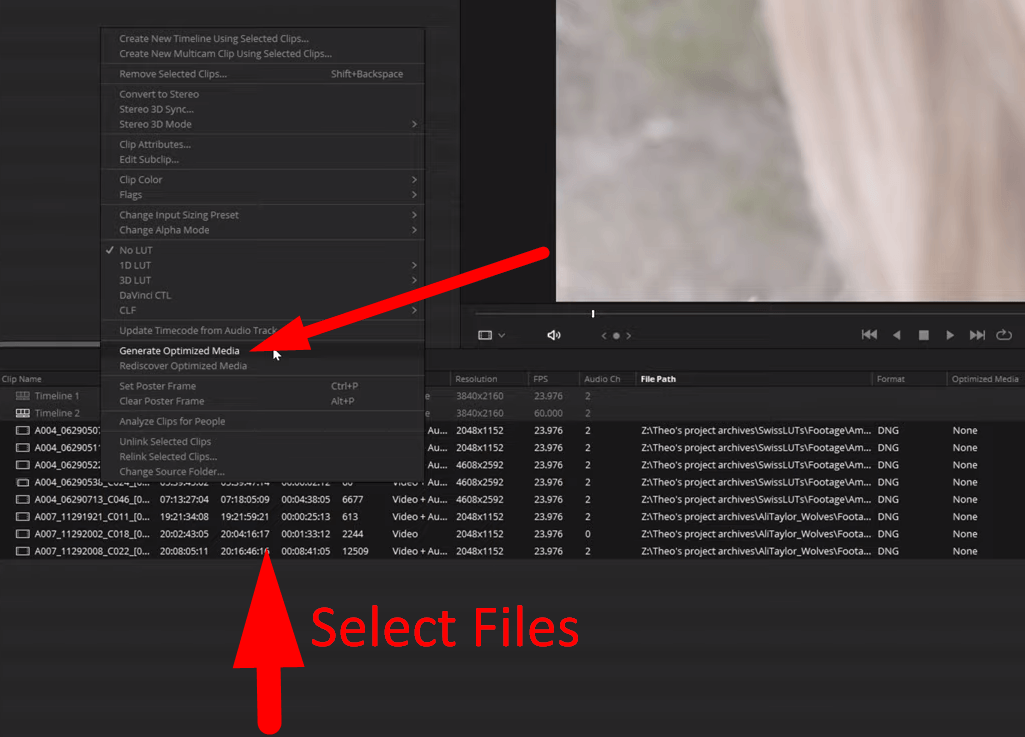
- Go to the “Media†tab from the bottom right corner and select the files you want to optimize.
- Right-click on files and choose “Generate Optimized Media.â€Â
- It will take time to “optimize†the media depending on the number of clips you have selected, their format, and length.
After optimizing the media, the clips playback in a uniform format without dropped frames.Â
Step 4- Enable the Optimized Media
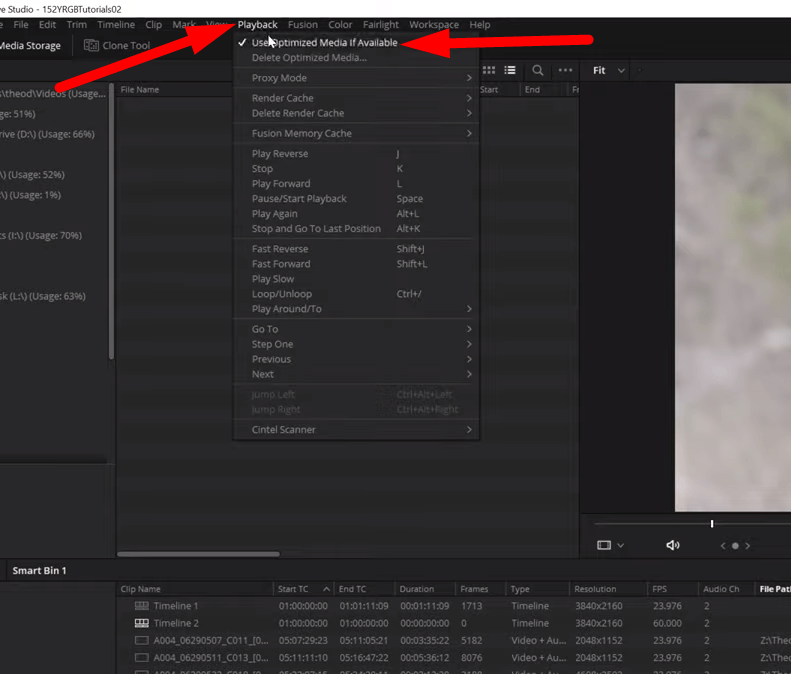
- Once the optimization is complete, open “Playback†from the main menu bar, hover over the “Render Cache†tab, and then choose “None.â€
- Then check “Use Optimized Media if Available.â€
Note: If your computer slows down during the process, hover over the “Timeline Proxy Mode†from the Playback menu. Choose “Half Resolution†or “Quarter Resolution,†depending on your system’s slowness.
Step 5- Disabling Optimized Media
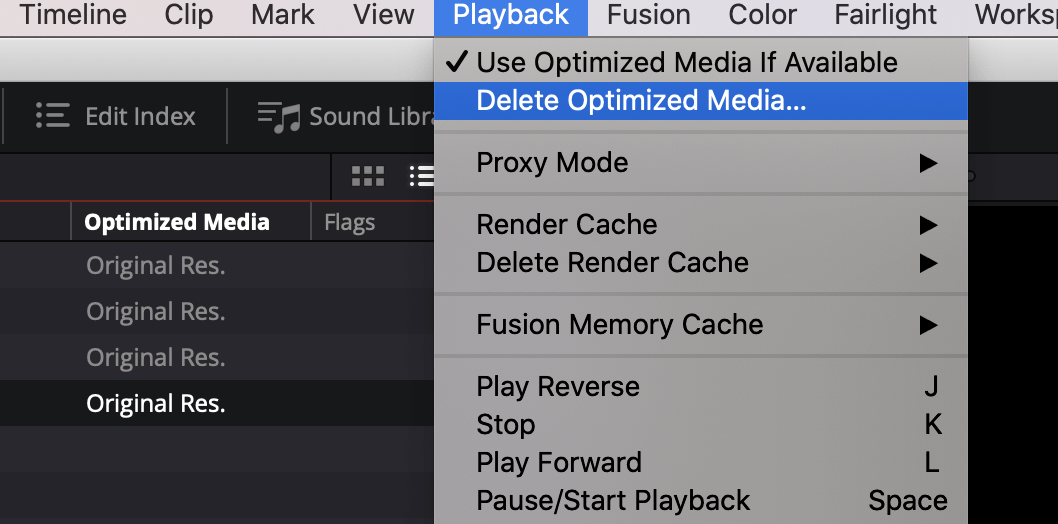
- Go to the “Playback†menu and check “Use Optimized Media if Available†to deselect it.
- It will move you back to the original raw file source.
- Moreover, open the “Render Page†by pressing “Shift + 8†and then scroll down to “Advanced Settings.â€Â
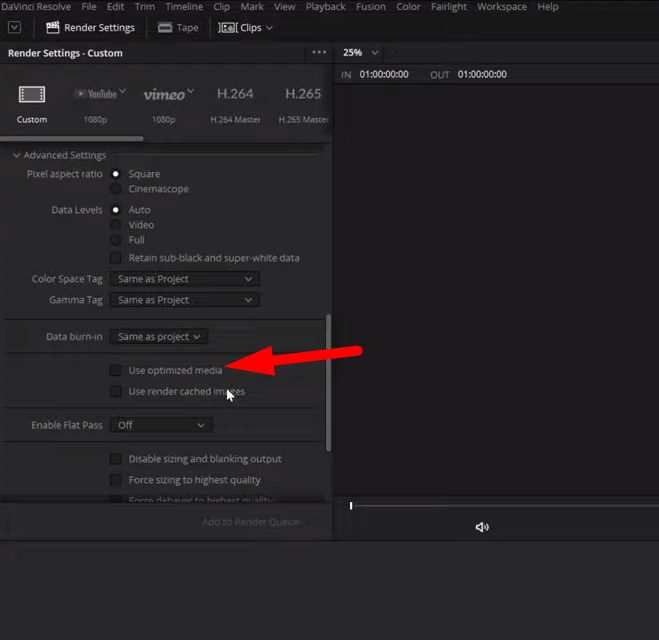
- Uncheck “Use Optimized Media†when you want to return to the original files for editing or color grading.
- From the “Playback†menu, switch off the “Timeline Proxy Mode.â€
This quick on-and-off feature is handy when editing or color-grading media files. So, switching to Render Cache or Smart Mode is necessary when editing or applying effects to the playback.Â
Step 6- Exporting the Files
- The primary purpose of optimized Media is to ensure smooth playback and enhance the editing process.
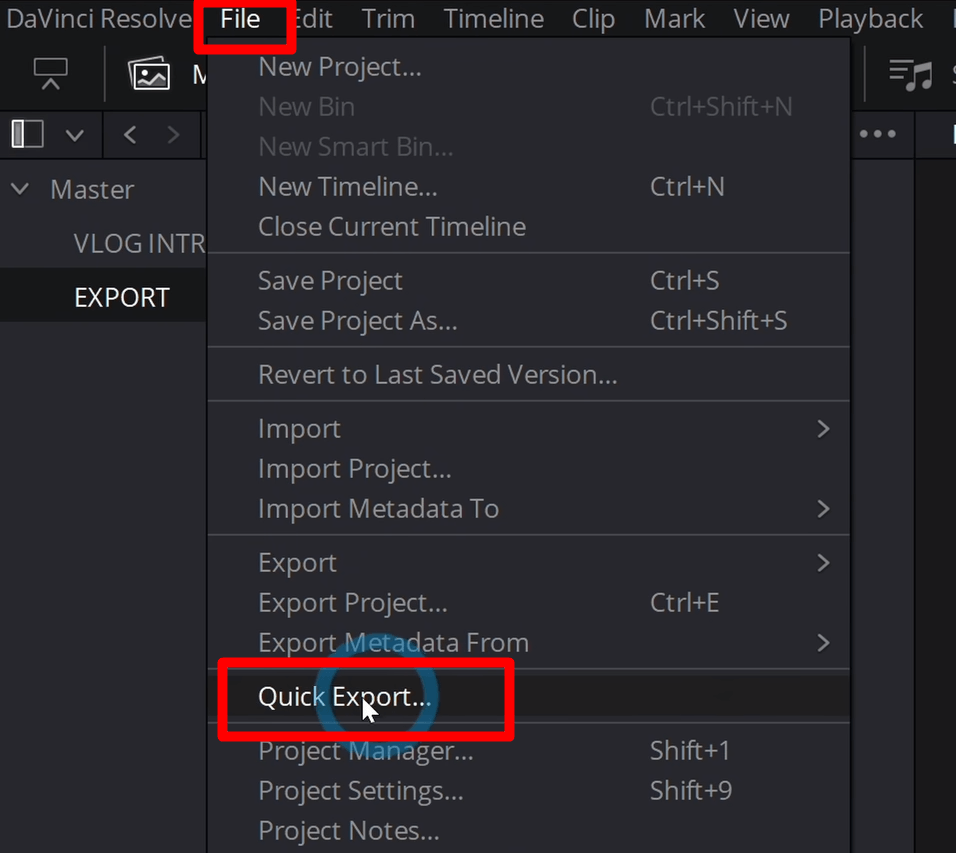
- Once satisfied with the editing, go to the “File†menu and select “Quick Export.â€
- Then, choose the desired format for your video files and select the storage location.
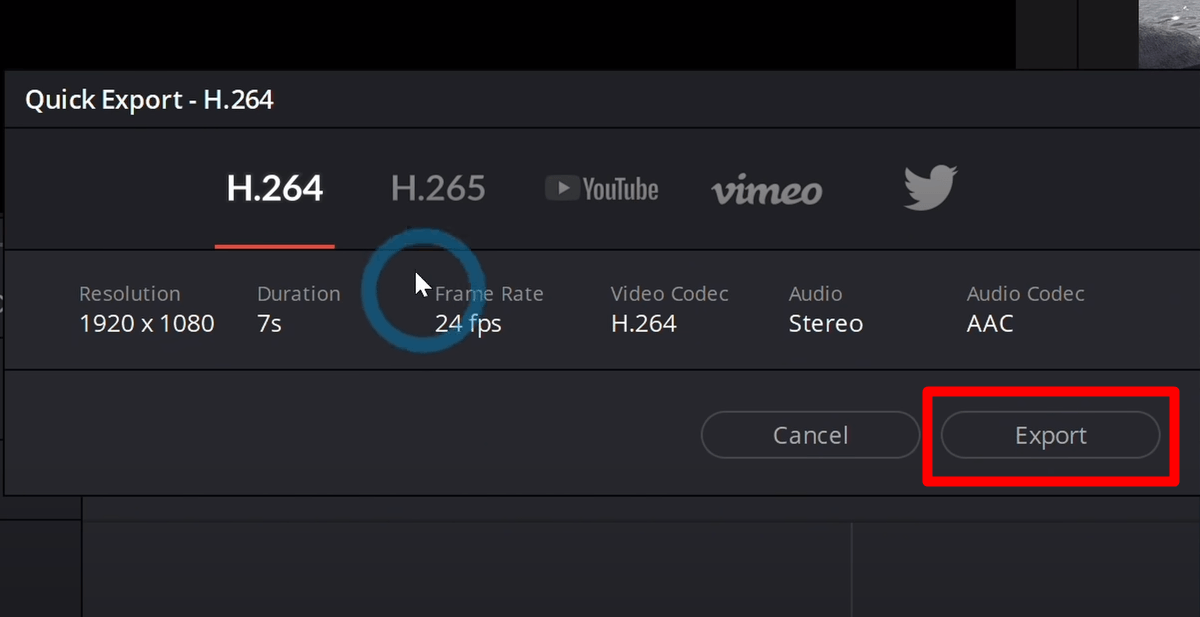
- Click “Export†to save the files.
Troubleshooting Common Issues
DaVinci Resolves Optimized Media is vital for optimal performance because it ensures the smooth playback of media files. However, it becomes frustrating when it encounters problems and slows the working process. So, here are common issues you face and how to troubleshoot them for a smooth and efficient workflow.
- Why is “Generate Optimized Media†so slow?
The Resolve will slow down the optimization process with improper network connection or if you use internal storage. Moreover, the time required to generate Optimized Media depends on the file size and duration, the codec, and the processing power of your operating system.
So, here are some fixes to solve the problem:
- Switch Resolves default storage location to local SSD because it ensures smooth performance. It also enhances its ability to read and write files during optimization efficiently.
- Ensure that individual files are rendered to smaller optimized resolutions and optimized formats.
- With the free version, the processor utilizes Windows transcoder, so it doesn’t allow hardware transcoder. Due to this, the CPU is unable to use its maximum potential.Â
- Switch to the full version of DaVinci Resolve to have full GPU acceleration or use additional software to transcode files.
- Why is “optimized media†generating so large files?
Optimized Media is essential to bring smoothness to choppy playback, but the error “insufficient disk space†arises. It happens with improper system setup and choosing higher resolution when optimizing the files. So, it’s essential to ensure:
- Change the default “Optimized Resolution†to lower from the raw media file.
- Set your project timeline to lower resolution and frames without affecting the quality.
- Check the codec compatibility and switch the “Optimized Format†to a lower codec like “DNxHR SQ†for optimal storage.
- Before importing the media files, set a lower bitrate for your recordings without impacting the quality.
- Optimized Media is automatically removed
After generating Optimized Media, it will automatically be removed and changes the media files to the original files. The issue arises when you close the Resolve and reopen it after some time to continue working on the files. It happens if you use an external drive and select a different path for optimized media in project settings.
- Ensure your optimized Media is stored on the correct drive from the settings.
- Change the “Optimized Resolution†and codec to lower files to ensure smooth playback.
- Also, ensure you are using an updated version and operating system.Â
- Unable to Generate Optimized Media
Sometimes, when you click to generate optimized media in the timeline, an error says, “Error encountered during optimized media generation. Ca.†It will stop the optimization process and doesn’t proceed further.
Moreover, after selecting “Generate Optimized Media,†the bar stops at 0%, and the bar windows close without optimizing. The error will arise if the CacheClip folder lacks space or you selected improper storage in the project settings.
From the “Finder†window, select “Resolve Cache†and choose “Cache Folder.†Then select “Optimized Media†and right-click to delete the cache. Deleting the cache folder will not affect the original media files but restore the storage.
- Ensure that the system and edit storage are the same for generating optimized media.
- Unable to change the Optimized Media Status
While Optimized Media is essential for smooth playback and editing, it becomes frustrating when you have to remove it. Even after you deselect “Use Optimized Media if Available,†the files remain optimized and don’t revert to the original media.
- Select “Smart Bin†to view a list of files, and you can analyze which files are optimized.
- Right-click to select “optimize media†and go to the project settings to choose the resolution.
- Under the “Playback†menu, select “Delete Optimized Media,†it will remove optimization from the timeline altogether.
What are the Advantages of Optimized Media in DaVinci Resolve?
Optimized Media significantly improves editing workflow and ensures smooth media playback. Here are the advantages to understand how it impacts your media files:
- Smooth Playback
DaVinci Resolve Optimized Media removes the choppy playback, ensuring smooth and efficient workflow. It reduces the processing workload by lowering the resolution without dropping frames or quality. So, it’s efficient when working with 4k or 8k files and ensures real-time playback.
- Efficient for Short Clips
While proxy files only have larger files, Optimized Media works with short clips. Therefore, it saves you time and storage when working on small files.
- Faster Editing
Optimized Media writes one file per frame and transcodes files faster. It temporarily changes the resolution and ensures a faster editing workflow. It enables you to edit or apply effects in real time without waiting for the video to catch up. Moreover, it improves the performance of media files, and you can change the optimized status after editing.
- Lower Processing Requirements
Optimized Media primarily benefits older computers because it works efficiently on low processing requirements. It allows you to enhance the playback performance by utilizing “resolutions and codecs†that are easy to process without impacting the quality.
Disadvantages of Optimized Media in DaVinci Resolve
While Optimized Media significantly improves performance, it has some disadvantages that must be considered:
- Limited Use
Optimized Media is designed for internal use within the DaVinci Resolve. So, ensuring smooth playback and enhancing the editing process is necessary. Also, it uses the .dvcc extension, which makes it difficult to share or export the optimized files to other computers.
- Optimized Media works with individual projects
While Optimized Media can be created for videos within a specific project, it will not optimize the same video in a different project. So, you have to “optimize†the media again when using it in different projects using the same DaVinci Resolve.
- Cannot see what files are optimized
It becomes difficult to see what files are optimized in the media pool. The Resolve 16 has a particular column in the media to show which files are optimized. However, this feature is unavailable in Resolve 17 and 18, so you cannot see what files are optimized from the media pool.
- Generate Large Files
Optimized media generates larger files than the original media, depending on your chosen codec and resolutions. So, it will quickly occupy all the storage space, and an error will pop up saying “insufficient storage space.â€
Conclusion
Optimized media is essential for smoother performance, faster processing, and real-time playback during editing. It’s also beneficial when working on older computers to enhance processing power efficiency. So, understanding how to generate optimized media and troubleshoot issues is essential for a smoother editing experience.
The Resolve Optimized Media enables you to transform your editing by efficiently removing the choppy playback without losing quality.
Frequently Asked Questions
What is the difference between Optimized Media and Proxy Media?
Proxy Media improves the performance and speed of editing files by generating lower resolution of high-resolution media. It allows you to name and link or unlink media files adequately. Also, proxy media is generated for the whole clip.
Optimized Media temporarily replaces the media files with a more efficient codec for editing and smooth playback. It creates a unique copy of raw files to remove choppy playback and allows you to select specific segments of clips.
How to improve DaVinci Resolve performance?
Improving DaVinci Resolve’s performance is essential when working with high-quality videos to ensure smooth performance. Here are the ways:
- Check system requirements and ensure you are using the updated Resolve version.
- Select “Optimized Media†if you are running on older computers.
- Use “proxy mode†for better playback performance during editing.
- It’s necessary to optimize the cache location to enhance the Resolves efficiency.
How can I check if a clip has Optimized Media in DaVinci Resolve?
Resolve provides a list view under the media pool to check if the clip has enabled optimized media. Right-click in the media pool and select “optimized media†to view the optimized files. However, this feature is unavailable in Resolve 17 and 18 versions, and viewing Optimized Media is impossible.Â
Is it possible to delete optimized media in DaVinci Resolve?
Resolve 16 has a dedicated “delete†button under the playback menu. However, the feature is unavailable for the Resolve 17 and 18 versions. So, to delete optimized media, locate the CacheClip folder on your system and delete the Optimized Cache. The Resolve will stop using optimization and revert to the original media.
1. What wireless network
Wireless network, as the name suggests, is a way to build a network without relying on network cables, which is mainly achieved by using wireless communication technology. There are two main ways of wireless network (such as 4G, 3G or GPRS) and wireless local area network (WiFi) through mobile communication networks.
2, What wireless bridge
Wireless bridge, as the name suggests, is the bridge of wireless network, which uses wireless transmission to achieve a communication bridge between two or more networks. In addition to having the basic characteristics of a wired bridge, a wireless bridge works in the 2.4G or 5.8G wireless license-free frequency band, making it easier to deploy than other wired network equipment.
From the function to understand the wireless bridge, it can be used to connect two or more independent network segments, these independent network segments are usually located in different buildings, hundreds of meters to tens of kilometers apart, can be widely used in the interconnection between different buildings.
At the same time, according to different protocols, wireless Bridges can be divided into 802.11b, 802.11g and 802.11n in the 2.4GHz band and 802.11a and 802.11n wireless Bridges in the 5.8GHz band.
3, the meaning of wireless bridge 2.4G and 5.8G
2.4G Bridge:
The advantages are low frequency, large wavelength and strong diffraction ability. Simply put, the propagation performance is good, and the propagation path is slightly shielded. Then there is the relatively low cost.
The disadvantage is that there are many devices using the 2.4G band, and the electromagnetic wave signal emitted by the bridge is easily interfered with the signal emitted by other devices, resulting in a decrease in transmission quality. Moreover, it is limited by the transmission bandwidth of the 2.4GHz band itself, which generally does not exceed 300Mbps
5.8G Bridge:
The advantages are high frequency, relatively pure channel, and large transmission bandwidth. The transmission bandwidth starts at 433Mbps and can easily reach more than 1Gbps. It is suitable for scenarios that require high data transmission.
The disadvantage is that the frequency is high, the signal wavelength is short, the penetration is poor, and there can be no shelter during the propagation. The cost of 5.8G equipment is higher than 2.4G, and it is still in the popularization stage.
Wireless bridge transmission system is usually composed of two or more wireless devices, due to the two-way transmission of data, each device needs to have the ability to send and receive wireless signals.
4, the working principle of wireless bridge
The working principle of the wireless bridge is that the bridge uses the air as a medium to transmit signals, which is simply that one end of the bridge converts the signal in the network cable into a wireless electromagnetic wave signal and transmits it to the air in a directional manner. The bridge at the other end does the opposite, picking up radio electromagnetic signals in the air and converting them into wired signals.
The wireless electromagnetic wave signal can be transmitted by air as the transmission medium, which can solve many problems of difficult construction of wired deployment: such as highways, rivers, mountain streams, or road hardening, and wired deployment and construction difficulties.
Wireless bridge networking has obvious advantages, and can achieve point-to-point or point-to-multipoint network connections at distances of up to 50 kilometers, and data transmission speeds of up to 108Mbps. Effectively solve the problem of network connectivity in the interval, as long as the wireless signal coverage area, the client can easily access the network, the fusion system, without any wiring, the wireless terminal can achieve zero configuration access, so it is very easy to carry out network maintenance and expansion.
Bridges are generally used in the following scenarios: wireless data acquisition, monitoring data transmission (outdoor and elevator), outdoor wireless coverage, outdoor remote wireless bridging, private ISP wireless broadband, unmanned monitoring station data return, etc.
5. How to choose the right bridge
Wireless bridge is a wireless monitoring and transmission equipment commonly used in the field of wireless monitoring, although it is a wireless device like wireless AP and Wireless Router, but it does not need to build wifi coverage, but is used to wireless transmission of video data. Like the switch in wired monitoring, the wireless bridge is an important transmission equipment in wireless monitoring, which is widely used in the two major fields of outdoor surveillance video transmission and elevator surveillance video transmission.
There are many kinds of wireless Bridges on the market, so how to choose a bridge that suits your needs? We will answer your questions from the following aspects.
â‘ Transmission distance
Wireless monitoring projects need to transmit the distance is not the same, wireless bridge transmission distance there are many kinds, some transmission 1~3 km, some transmission 3~5 km, some transmission 5~10 km, some transmission more than 20 km, must be determined according to the monitoring of the transmission distance, as far as possible the maximum transmission distance of the bridge is greater than the monitoring transmission distance, Because rain, fog, snow and other weather in the actual application environment will cause the transmission performance of the bridge to decline, the project construction should reserve sufficient performance margin.
â‘¡ Transmission bandwidth
There are many kinds of transmission rates of wireless bridge, such as 150Mbps, 3000Mbps, 450Mbps, 600Mbps, 900Mbps, etc., which rate to choose can be determined according to wireless monitoring requirements. What users actually need to consider is the transmission performance of the bridge over a specific distance, rather than the theoretical bandwidth data. For example, the theoretical transmission bandwidth of the IP-COM AP625 bridge is 433Mbps, and the actual point-to-point transmission bandwidth can reach 200Mbps at a distance of 2 kilometers, with 25 200W cameras without pressure.
â‘¢ Operating frequency
There are two main operating frequencies of wireless Bridges, 2.4G and 5.8G, and the characteristics of the two Bridges are different. In general, 2.4G wireless bridge is the current mainstream frequency band, good compatibility, good diffraction ability, but the anti-interference is relatively poor, especially in the urban area is vulnerable to wireless signal interference transmitted by other WiFi devices. The 5.8G channel is relatively pure, the anti-interference ability is better, the transmission distance is long, but the diffraction ability is poor.
Urban, downtown, long-distance transmission, camera stream is large, 2.4G interference is more, choose 5.8G wireless bridge. Others such as the transmission distance is relatively close, relatively remote, and the same frequency interference is less, etc. 2.4G wireless bridge is used
â‘£ antenna
Antenna is an important part of wireless bridge, used to transmit and receive wireless signals, no antenna, wireless bridge can not achieve communication. There are many types of antennas, including omnidirectional antennas and directional antennas. Omnidirectional antenna is used for short-range coverage and transmission, and directional antenna should be selected for long-distance bridge. The larger the gain of antenna, the better the performance of wireless bridge.
⑤ Power supply mode
The working environment of the wireless bridge usually involves some complex outdoor environments, such as forests, ports, tunnels, reservoirs and other places, so the power supply is a more troublesome problem. Choosing a wireless bridge that supports POE cable power supply can solve this problem well. IP-COM bridge all support PoE injector power supply, power supply distance up to 60 meters.
â‘¥ Protection level
The wireless bridge works outdoors, the environment is changeable, such as rain, rain and snow, high temperature, etc., the first requirement is waterproof, dustproof, heat resistance, and condensation resistance. For a qualified wireless bridge, these "qualities" are a must.
⑦ Pairing method
At present, there are three mainstream bridge pairing methods: key pairing, dip code pairing, automatic pairing. In terms of the simplicity of engineering applications, especially for projects that install dozens or hundreds of network Bridges at a time, automatic pairing is undoubtedly the best choice. IP-COM network bridge supports the automatic pairing of two network Bridges when they are powered on in the factory state, greatly reducing the workload.
6, wireless bridge installation requirements
Wireless bridge is an important transmission equipment in wireless monitoring, which is widely used in outdoor surveillance video transmission and elevator surveillance video transmission. In addition to selecting the right wireless bridge, we also need the bridge equipment to give full play to its performance advantages after installation to assist users in the project. Therefore, for some installation requirements and precautions of wireless bridge, we should pay more attention to avoid various problems in the later stage.
â‘ Installation height
In the process of wireless transmission, obstacles such as trees, buildings and large reinforced buildings will weaken and block wireless signals. In order to improve the wireless transmission performance and prevent signal damage and weak signal, the user should try to ensure that there are no obstacles in the transmission route of the wireless bridge during installation, and meet the transmission conditions that the two ends can see each other.
Both ends can not be simply understood as point-to-point visibility, which means that there can be no obstacles or potential obstacles in the Fresnel zone (radio wave terminology) in which the antenna is propagated. The main RF energy between the antennas is transmitted in this area, so the transmitting antenna must be high enough above the obstacle to maintain a line of sight path between it and the receiving antenna in order for the communication link to work properly.
â‘¡ Angle and signal debugging
Since the quality of the wireless bridge signal is directly related to the bandwidth and stability of the link, it is necessary to further debug the wireless bridge signal after the installation is completed (the signal strength can be adjusted by adjusting the direction of the antenna on both sides, the pitch Angle, etc.). The signal strength can be checked according to the signal status indicator of the bridge device (three lights, three signals are best, two are average, and one is poor) or the software. Detailed installation procedure for outdoor wireless aps
â‘¢ Requirements for lightning rod
When the wireless bridge is installed in the field, if there are no tall buildings or lightning rod protection nearby, lightning protection measures need to be considered, usually using lightning rod, generally installed in the urban area or surrounded by lightning rod protection, can not be set separately.
It can be seen from the characteristics of the lightning rod that the lightning rod is a lightning source, and the lightning rod will discharge in the grounding path when it is hit by lightning. Therefore, the lightning rod and the protected equipment need to be insulated, otherwise the lightning rod will have a lightning effect on other equipment when discharging. Due to the tip discharge characteristics of the lightning rod, it is easier to cause lightning discharge than the general equipment, so if the lightning rod cannot be isolated from the protected equipment, it will increase the probability of lightning strikes of other equipment. Therefore, the lightning rod grounding must be separate from the device grounding and cannot share the same grounding.
Do enterprises most afraid of products can not be sold, enterprises have no visibility. Now is the Internet era, the era of wine not afraid of the alley is gone. Want to do a good job in sales, please register for free Aike business network members, you can free release product sales information, industry exhibition information, investment information, can also release corporate news, new product delivery and other advertising articles. There are more than a dozen vertical business websites under the Aike business network, such as plastic business network, chemical business network, instrument business network and so on. Register an account and you can publish business information on more than 10 platforms for permanent display. Colleagues are on the move, you must not forget oh.
â‘£ Power supply requirements
The normal input voltage of the PoE power module of the bridge ranges from 100V to 240V and the output voltage ranges from 24V to 48V. If the voltage is lower than or higher than this voltage, the normal operation of the device is affected or the PoE power module is damaged. In view of the unstable and high voltage field power supply, it is necessary to design a PoE power supply solution (such as regulated power supply and UPS power supply) that ADAPTS to the working voltage.
Because the bridge is a precision electronic equipment, it has high requirements for power supply, and is vulnerable to the impact and influence of other power supply equipment, so the power supply of the bridge should be separated from other high-power equipment such as pumping units, oil pumps, etc. When taking power at the same location, UPS, regulated power supply or isolation transformer should be installed to filter out the influence and interference on the power supply when the high-power motor is working.
When the PoE module is used to power the bridge through the network cable, the recommended distance is not more than 60 meters. When this distance is exceeded, it is recommended to move the transmission line near the bridge to meet the recommended power supply distance.
⑤ Device grounding requirements
The wireless bridge should be grounded. If the device is not grounded, the device may run abnormally or be damaged. The grounding resistance of the device should be less than 4 ohms, and the grounding cannot be shared with the lightning rod or strong current line. If PoE power is used, the ground cable also needs to be grounded. Users can ground a Class 5 (or higher) shielded network cable with a ground cable and a PoE adapter to effectively prevent static electricity and lightning strikes. The ground cable and ground point should be waterproof using waterproof tape and waterproof cement according to the waterproof requirements to prevent the ground point from being exposed to the air for a long time, which may cause oxidation or rust.
7, wireless bridge erection method
There are four common wireless bridge transmission modes, the distribution is point-to-point, point-to-multipoint, relay, reflection, here the first monitoring combined with pictures for you to briefly introduce the characteristics of these four wireless transmission modes.
â‘ point-to-point transmission
Point-to-point transmission mode is the simplest transmission mode, that is, we often say PTP, to a single device transmission, and then received by a single device, one-to-one transmission and reception is simple and direct. Point-to-point transmission mode of wireless bridge is often used in the case that the transmission distance is long, or the monitoring point is widely distributed, and point-to-multipoint transmission cannot be achieved.
â‘¡ Point-to-multipoint transmission
The point-to-multipoint transmission mode is developed based on the point-to-point transmission mode, which is often represented as a receiving end to multiple transmitting ends, and is often used for the situation where the transmission distance is relatively close, there are more monitoring points and the distribution is dense.
â‘¢ Relay transmission
The relay transmission mode is because the transmitting end and the receiving end can not avoid the barrier blocking the microwave signal, so the transfer equipment is added in the middle, so that the microwave signal is smoothly transmitted to the receiving end through the transfer equipment, this mode is due to increase the transfer equipment and increase the equipment cost investment, so it is generally not used when unnecessary.
â‘£ Reflection transmission
Reflection transmission is microwave transmission with the help of objects outside the transmission device, such as the transmitting end and the receiving end can not be seen, but there is a large building or a mountain with smooth rock walls in the middle, so that you can adjust the Angle of the equipment, through the building or mountain to reflect microwave signals for wireless communication.
Wireless Bridge,Wifi Wireless Bridge,Gigabit Wifi Bridge,Long Range Wifi Bridge
Shenzhen MovingComm Technology Co., Ltd. , https://www.szmovingcomm.com